One of the challenges that we face in Labs and Research at Crossref is that, as we prototype various tools, we need the community to be able to test them. Often, this involves asking for deposit to a different endpoint or changing the way that a platform works to incorporate a prototype.
The problem is that our community is hugely varied in its technical capacity and level of ability when it comes to modifying their platform.
When each line of code is written it is surrounded by a sea of context: who in the community this is for, what problem we’re trying to solve, what technical assumptions we’re making, what we already tried but didn’t work, how much coffee we’ve had today. All of these have an effect on the software we write.
By the time the next person looks at that code, some of that context will have evaporated.
It turns out that one of the things that is really difficult at Crossref is checking whether a set of Crossref credentials has permission to act on a specific DOI prefix. This is the result of many legacy systems storing various mappings in various different software components, from our Content System through to our CRM. To this end, I wrote a basic application, credcheck, that will allow you to test a Crossref credential against an API.
Subject classifications have been available via the REST API for many years but have not been complete or reliable from the start and will soon be deprecated. dfdfd
The subject metadata element was born out of a Labs experiment intended to enrich the metadata returned via Crossref Metadata Search with All Subject Journal Classification codes from Scopus. This feature was developed when the REST API was still fairly new, and we now recognize that the initial implementation worked its way into the service prematurely.
Implementing Crossmark includes several stages, which require increasing technical knowledge. If you are not able to finish the process, that’s ok, make a start and continue when you have the expertise to do so.
Full implementation means that you’ll need to include Crossmark-specific metadata for each DOI that you register. And you’ll need to add the DOI in a html meta-tag in each article landing page where Crossmark is implemented, as well as include a script in the source code for each page that calls the Crossmark dialog box.
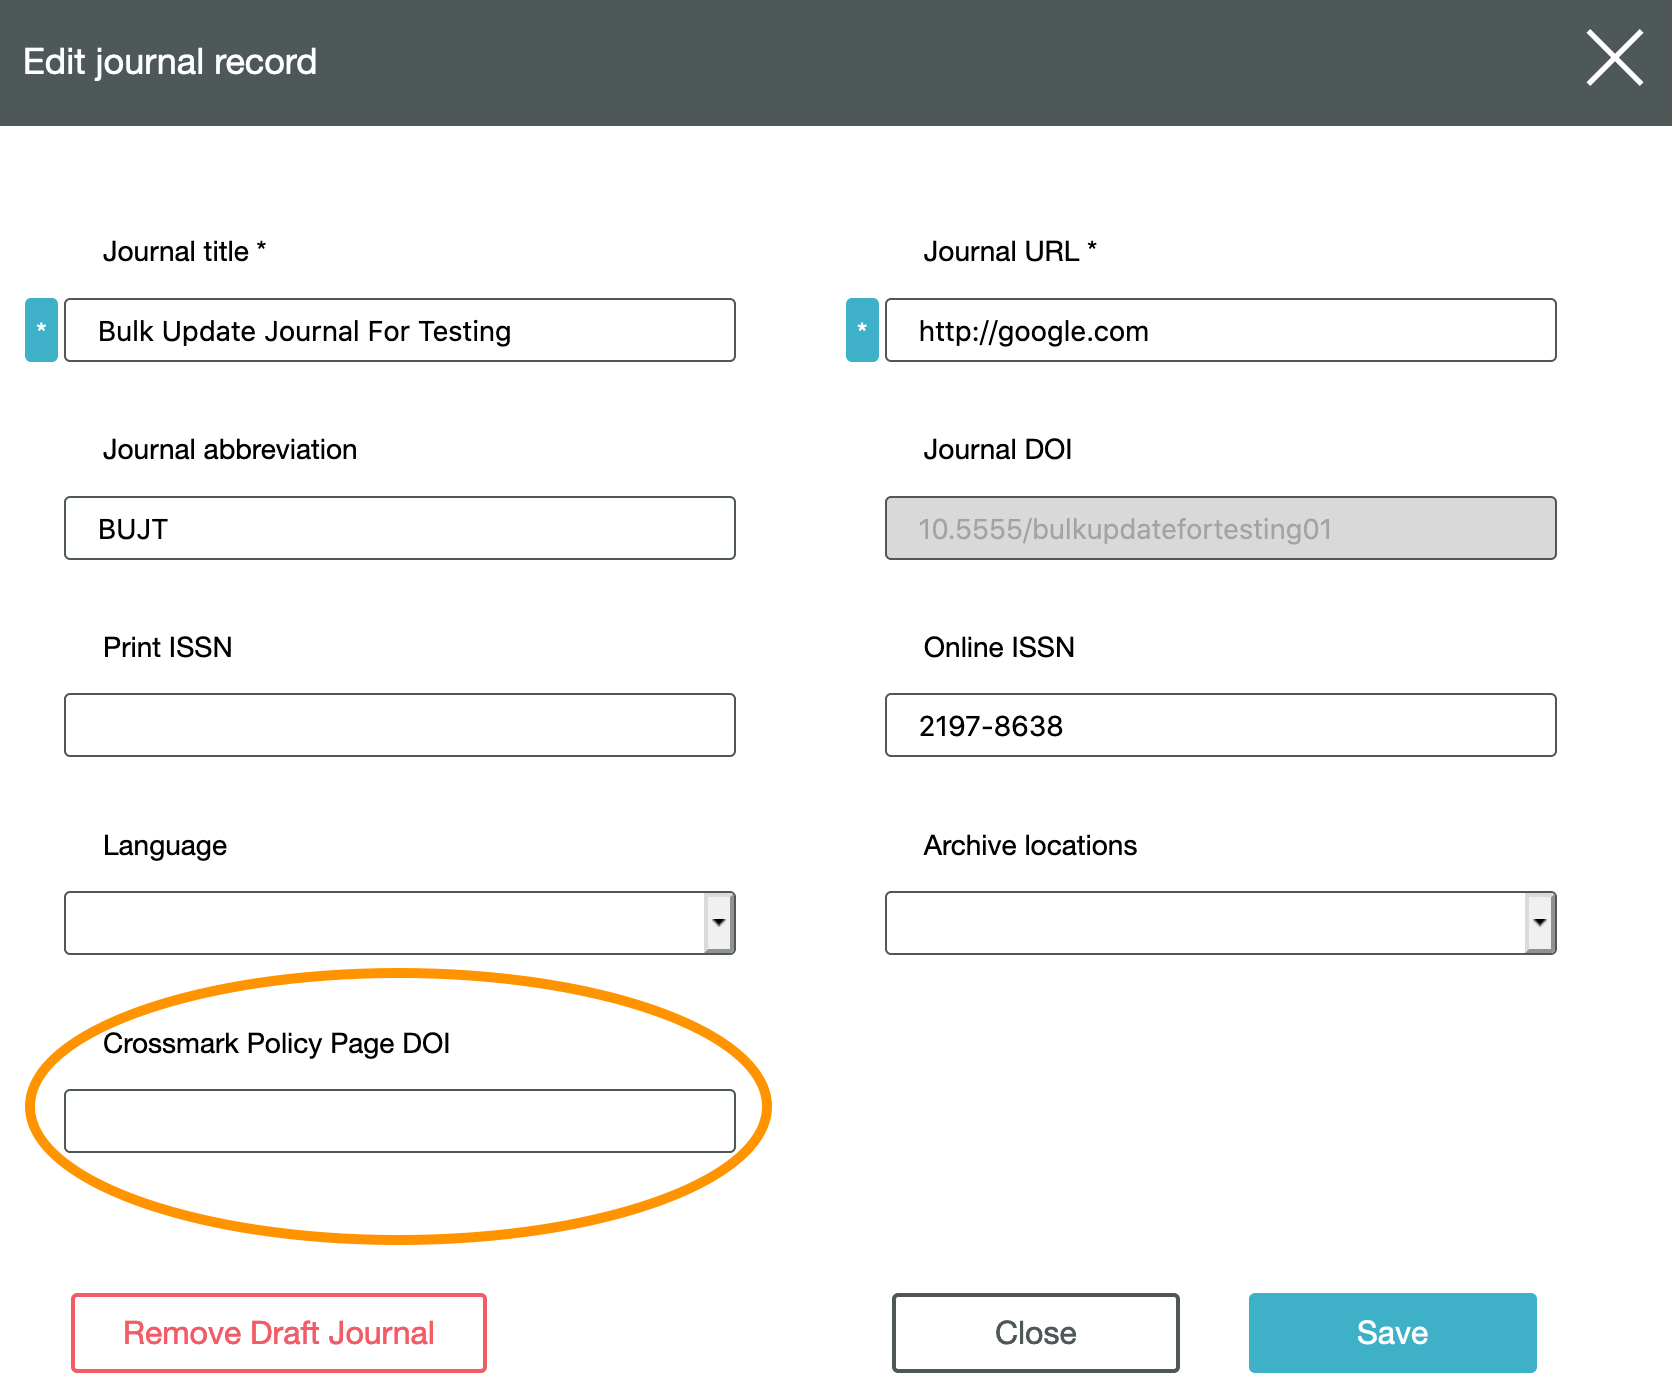
Step one: Designate a Crossmark policy page and assign it a DOI
You’ll need a way to explain Crossmark to your readers. To do this, you’ll need a page on your website explaining that you are participating in the Crossmark service and explaining how you maintain and update your content. This page should be registered and have a DOI to enable persistent linking. It must include your policies on corrections, retractions, withdrawals and other updates, and may contain definitions and explanations of any additional custom metadata fields that are being used. The page could also include links to other relevant policies such as author submission guidelines, and peer review guidelines. You may already have a suitable page on your website, but don’t forget to register it with us so it has a DOI.
Step two: Deposit the minimum Crossmark metadata for all your content
It’s important to apply the Crossmark button to all of your current content, not just content that has updates. The problem with partial implementation of Crossmark is that when an item of content is published, you won’t know if it might need to be updated at some point in the future. Therefore, a researcher may download a PDF article today without a Crossmark button, but if the article is subsequently updated and the Crossmark button is added, the researcher has no way of knowing if their locally-saved article is still current, as it had no Crossmark button at the point when they downloaded it. If you’re using the Crossmark service, we’d expect you to display the Crossmark button on all your content, whether or not it has an update.
The minimum metadata required for the Crossmark button to display is:
The DOI of the content the Crossmark is being applied to
The DOI for your Crossmark Policy Page
Deposit Crossmark metadata by direct deposit of XML
If you usually register your content with us by uploading XML files into the admin tool or sending us XML by HTTPS POST, then you can include Crossmark metadata in your initial deposit. You can also add Crossmark metadata to existing DOIs using a resource-only-XML deposit. Some members find our XML samples helpful for full and resource-only deposits.
Deposit Crossmark metadata the web deposit form (or if you’re still using the deprecated Metadata Manager)
Simply add your Crossmark metadata into the relevant fields.
In Metadata Manager, you need to add the Crossmark Policy Page up at journal level. Go to the journal-level record for your publication, add your Crossmark policy page DOI, and click Save.
Deposit Crossmark metadata using the Crossref plugin for OJS
This is not currently available, but is planned.
Step three: Add metadata that reflects any updates to specific items
If there is an update to a content item, you need to add extra Crossmark metadata to indicate this. Updates should only be deposited for editorially significant changes - those that are likely to affect the interpretation or crediting of the work, and not for minor changes such as spelling corrections or formatting changes.
There are 12 defined types of accepted update within Crossmark:
addendum
clarification
correction
corrigendum
erratum
expression_of_concern
new_edition
new_version
partial_retraction
removal
retraction
withdrawal
If an update does not fall into one of these categories, it should instead be placed in the more information section of the pop-up box by being deposited as an assertion. Please note - @order is an optional attribute. If @order is absent, it will return results in the order in which you list them in your deposit, but this is not guaranteed. If you want to be sure of the order, then you can use @order. Learn more about the Crossmark deposit elements (including what is optional) in the schema.
When deposited content corrects or updates earlier content, the DOI(s) of the corrected content must be supplied in the Crossmark metadata. See the Crossref unixref documentation section on updates for examples of how this is recorded in the Crossmark metadata.
When a correction is made in situ (that is, it replaces the earlier version completely), then the DOI of the corrected content will be the same as the DOI for the original Crossref deposit. In situ updates are not considered best practice as they obscure the scholarly record.
Step four: Apply the Crossmark button to your HTML pages
Add the button
We supply a templated HTML/JavaScript code widget which will embed the Crossmark button and functionality into your web pages. The latest version of the widget (v2.0) is below. Do ensure you are using the latest version and that it points to our production server. Do not alter the script or host the button locally.
There are a number of variations of the Crossmark button available so that you can choose one that fits well on your site. You can change the Crossmark button that is used simply by changing the src attribute of the img element to point to one of the following:
Alternatively, this you can view source on this page to see the correct code snippets for each style of button.
The button can be resized according to your design needs by changing the image width in the image tag but do follow the Crossmark button guidelines.
Don’t forget to record the DOI in the HTML metadata
The Crossmark button needs to have a DOI to reference in order to pull in the relevant information. This needs to be embedded in the head of the HTML metadata for all content to which Crossmark buttons are being applied as follows:
It may appear redundant to apply Crossmark elements both in their own Crossmark namespace as well in the pdfx namespace, but the latter is necessary to ensure the Crossmark elements appear in the PDF dictionary, a specific requirement for some search engines. Any metadata found in the pdfx namespace will be copied over to the document info dictionary. Simply make sure that Crossmark metadata is in the pdfx namespace in the XMP provided to the tool.
The link structure for Crossmark links from PDFs looks like this:
domain tells the Crossmark system what kind of static content the link is coming from, and will change for different static formats (such as epub)
date_stamp tells the Crossmark system the date on which a last Major Version of the PDF was generated. In most cases, this will be the date the article was published. However, when a member makes significant corrections to a PDF in-situ (no notice issued, and no new version of the work with a new DOI) then the date_stamp should reflect when the PDF was regenerated with the corrections. The system will then use the date_stamp in order to tell whether the reader needs to be alerted to updates or not. The date_stamp argument should be recorded in the form YYYY-MM-DD (learn more about ISO 8601).
Further options: adding more information to the Crossmark button
The Crossmark box has a section for you to show any additional non-bibliographic information about the content. You decide what to include here (you are not required to add anything). In this section, Crossmark participants often include publication history dates, details of the peer review process used, and links to supporting information.
Use Metadata Manager to add custom metadata, or use the assertion element in your XML.
Several metadata elements will automatically display in the Crossmark box if you are registering them:
Author names and their ORCID iDs (learn more about contributors)
If you are already registering this additional metadata at the time you implement Crossmark, there is nothing more you need to do. If you start to register these metadata elements after you have set up Crossmark, they will automatically be put into the Crossmark box.
Page owner: Isaac Farley | Last updated 2023-February-17